kbmFMX Pro was released a short while ago with one of the flagship components being the Firemonkey based virtual keyboard.
This blogpost series is an attempt to explain what the keyboard consists of and how to use it and customize it.
The keyboard was developed due to a personal need for a better virtual keyboard for POS type terminals running on Windows. The current virtual keyboards had the problem of not being configurable enough and not being consistent. One virtual keyboard turns up on Windows when you click on a Firemonkey based TEdit box, but another turns up when you click on the keyboard icon on the Windows taskbar.
That is simply an ugly mess.
As mentioned, the existing keyboards also had the problem of not being completely customizable. Every application may have it’s own requirements for virtual buttons and keyboard layouts, hence a new virtual keyboard should support that.
And then one thing lead to the next, and we ended up with the most complete virtual keyboard ever programmed for Firemonkey and Delphi, probably even surpassing any made for the VCL, although this does require Firemonkey.
Structure
TkbmFMXKeyboard is the main visual control class. It however does not do all the work by itself but work in cooperation with a number of other classes, which are designed in such way that they make it easy to customize your personal keyboard preferences.
After optionally extending the extendable classes, your new class needs to be registered with TkbmFMXKeyboard to be available for use.
Currently the following areas are covered by extendable classes:
Layout – TkbmFMXCustomKeyboardLayout
The layout defines the where keys are placed on a keyboard. A keyboard consists of a number of key rows. A row can contain from zero to many keys, which each can have a different size and layout. Each key is represented with a virtual key number where the constants vkXXX found in System.UITypes are used. In addition to the ones defined in System.UITypes, kbmFMXKeyboard defines additional virtual key codes which are missing.
OEM_Plus = $33BB; // For any country/region, the ‘+’ key
OEM_Comma = $33BC; // For any country/region, the ‘,’ key
OEM_Minus = $33BD; // For any country/region, the ‘-‘ key
OEM_Period = $33BE; // For any country/region, the ‘.’ key
OEM_1 = $33BA; // Used for miscellaneous characters; it can vary by keyboard. For the US standard keyboard, the ‘;:’ key
OEM_2 = $33BF; // Used for miscellaneous characters; it can vary by keyboard. For the US standard keyboard, the ‘/?’ key
OEM_3 = $33C0; // Used for miscellaneous characters; it can vary by keyboard. For the US standard keyboard, the ‘`~’ key
OEM_4 = $33DB; // Used for miscellaneous characters; it can vary by keyboard. For the US standard keyboard, the ‘[{‘ key
OEM_5 = $33DC; // Used for miscellaneous characters; it can vary by keyboard. For the US standard keyboard, the ‘\|’ key
OEM_6 = $33DD; // Used for miscellaneous characters; it can vary by keyboard. For the US standard keyboard, the ‘]}’ key
OEM_7 = $33DE; // Used for miscellaneous characters; it can vary by keyboard. For the US standard keyboard, the ‘single-quote/double-quote’ key
OEM_8 = $33DF; // Used for miscellaneous characters; it can vary by keyboard.
OEM_102 = $33E2; // Either the angle bracket key or the backslash key on the RT 102-key keyboard
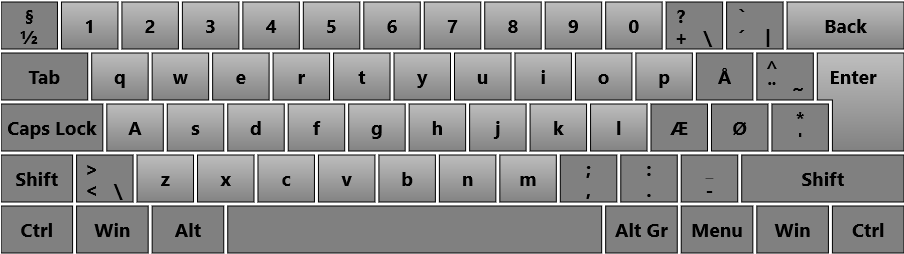
Let us look at how a layout is defined by looking at the included alphanumeric keyboard layout. The alphanumeric keyboard follows this layout:
As you may notice, it is basically a keyboard with all the regular alpha numeric keys and various control keys following the US layout.
The red font keys indicates socalled OEM keys, which are keys that may contain various different characters depending on the chosen language (region in kbmFMX Keyboard terms). So in case of the A key, it is defined using the virtual key vkA and so forth.
Now let us scrutinize the layout code for the TkbmFMXAlphaNumericKeyboardLayout class.
  TkbmFMXAlphaNumericKeyboardLayout = class(TkbmFMXCustomKeyboardLayout)
  protected
    procedure Define; override;
  public
    class function GetName:string; override;
  end;
First we see that we need to give the custom layout a name. It is by this name that we later can select to use this particular keyboard layout. It is set on the TkbmFMXKeyboard.Layout property that takes a string.
2ndly the actual layout is defined in the Define method. At all times we have access to the Keyboard property which provides access to the TkbmFMXKeyboard instance with all its methods and properties.
We use this to add key rows to the keyboard, by calling AddRow. The returned TkbmFMXKeyRow instance provides various methods to enable us to manipulate that row of keys, like adding new keys which is the primary purpose of the layout class.
Default the layout starts out with no rows defined, but if you descend from another layout, you may already have rows (and defined keys) available for you, which you can then add to in your own layout.
First row, adds an OEM_3 key, then the virtual keys 1 to 0, then two additional OEM keys, and a backspace key identified by the virtual key code vkBack. The virtual key codes provided for AddKey are the ones that we will used to reference that particular key in other places (like region definition, see next chapter).
All the keys defined until the backspace key, where defined using a standard square size, while the backspace key is defined to be twice as wide as it is high. In fact what we are stating is that the key should be rendered with the key path TkbmFMXKey.P_200_100 which is simply a string constant that translates to:
‘M0,0 L2,0 L2,1 L0,1 Z’
It is a SVG path, having upper left corner as x=0,y=0. Thus the paths starts with M0,0 (move to 0,0), make a line to 2,0, another line to 2,1, a line to 0,1 and finally close the path (Z).
The other keys automatically use TkbmFMXKey.P_100_100 which is default when no drawing path has been defined. for a key. kbmFMXKeyboard will automatically detect the boundaries of this path and make sure that it is exactly twice as wide as the other keys with the path P_100_100.
A large number of standard paths are predefined for our use, but you can essentially make your own paths as you see fit as long as you assume a normal key is exactly 1 unit wide and 1 unit high:
P_100_50
P_25_100
P_50_100
P_75_100
P_100_100
P_125_100
P_150_100
P_175_100
P_200_100
P_225_100
P_250_100
P_275_100
P_300_100
P_325_100
P_350_100
P_375_100
P_400_100
P_425_100
P_450_100
P_475_100
P_500_100
P_525_100
P_550_100
P_575_100
P_600_100
P_625_100
P_650_100
P_675_100
P_700_100
P_725_100
P_750_100
P_775_100
P_125_200_ENTER – Contains the shape of a typical Enter/return key taking up 125% normal key width, and 200% normal key height (two rows)
P_100_200
P_200_200
P_300_200
The Backspace key also have an additional definition, the standard (normal non shifted) text to show on it (Back).
The method continues defining the remaining 4 rows, with the only “oddity” being the Enter key, where we also define that any text written on it, should be constrained to the area given by TkbmFMXKey.P_125_100 (essentially the top half of the Enter button). Notice how a fluent syntax is used to setup features on each define key.
Hence the layout directly define the keys available on the keyboard.
The key description in the layout also defines the default values to present and what return to an application when the key is pressed, either alone or in combination with the shift, control or alt keys.
However as we all know, different regions have same keyboard layout but different texts on the keys and should return different things, despite the physical key not having moved around. For that reason kbmFMXKeyboard knows about regions.
It is allowed to add spacer keys. That is a key definition which has the virtual key code vkNone. It acts as a spacer (matching the given key shape) and is never shown.
What we have not yet talked about is that kbmFMXKeyboard also supports until 3 different layers for each layout. The idea is to support compact mobile keyboards, where you would press for example a 123 button to get all the digits and various other symbols presented. And on that layer there would be an ABC button to take you back to the layer in the layout that contains the regular alphabet characters.
Above we only defined a single layer, namely layer 1 (kbmll1). Each layer can have its own number of rows and keys and thus do not need to be laid out as the first layer.
To define keys for layer 2 write this code, before adding a row:
Keyboard.LayoutLayer:=kbmll2;
You can switch layer anytime in the Define method to define the layers you need.
However you will need to ensure that at least one key on each layer is defined as a layer shifting key. You use the special virtual key codes vkSelectLayoutLayer1, vkSelectLayoutLayer2 or vkSelectLayoutLayer3 for the layer change key. Example:
You can also specify specific text settings like font and style via the TextSettings property of the key.
If EnableCustomTextSettings or EnableCustomFill is false, the keyboard renderers default settings will be used.
You can even specify the background RGB LED light of a key at layout time by setting the color using SetAmbientLEDColor, the intensity using SetAmbientLEDIntensity and if the LED should be on or off using SetAmbientLED. However usually you will leave the background LED coloring be handled by a LED animator. See Animation in a later chapter.
Finally the new custom layout is registered by calling:
Where the layout describe the “physical” placement of keys and some defaults, the region describes what should be shown on the key and what should be returned from it, in a specified region (area of the world).
In fact despite keyboard layout’s may look identical (apart from the print on the keys), the actual virtual key codes returned from each key at some occations also changes when the region change.
For that purpose kbmFMXKeyboard provides elaborate support for defining region specific settings for keys.
Le us check out the source of a couple of the included regions. First the US region which is the simpler of them, since it matches the virtual key codes used in the standard alphanumeric layout.
class function TkbmFMXUSKeyboardRegion.GetName:string;
begin
     Result:='US';
end;
class function TkbmFMXUSKeyboardRegion.GetName:string;
begin
     Result:='US';
end;

procedure TkbmFMXUSKeyboardRegion.Define;
begin
     Define_QWERTY;
     Define_0_9_US;
     Define_Numpad0_Numpad9;
     Define_NumpadMath;

     Map(vkSpace,TkbmFMXKeyboardRegionKey.Create(' '));
     Map(vkTab,TkbmFMXKeyboardRegionKey.Create(#9));
     Map(vkDecimal,TkbmFMXKeyboardRegionKey.Create('.'));

     Map(OEM_1,TkbmFMXKeyboardRegionKey.Create(';',':','','',[kbmrkoPresentAuto],vkOEM1));
     Map(OEM_2,TkbmFMXKeyboardRegionKey.Create('/','?','','',[kbmrkoPresentAuto],vkOEM2));
     Map(OEM_3,TkbmFMXKeyboardRegionKey.Create('`','~','','',[kbmrkoPresentAuto],vkOEM3));
     Map(OEM_4,TkbmFMXKeyboardRegionKey.Create('[','{','','',[kbmrkoPresentAuto],vkOEM4));
     Map(OEM_5,TkbmFMXKeyboardRegionKey.Create('\','|','','',[kbmrkoPresentAuto],vkOEM5));
     Map(OEM_6,TkbmFMXKeyboardRegionKey.Create(']','}','','',[kbmrkoPresentAuto],vkOEM6));
     Map(OEM_7,TkbmFMXKeyboardRegionKey.Create('''','"','','',[kbmrkoPresentAuto],vkOEM7));

     Map(OEM_Minus,TkbmFMXKeyboardRegionKey.Create('-','_','',''
                                                   ,[kbmrkoPresentAuto],vkOEMMinus));
     Map(OEM_Plus,TkbmFMXKeyboardRegionKey.Create('=','+','',''
                                                   ,[kbmrkoPresentAuto],vkOEMPlus));
     Map(OEM_102,TkbmFMXKeyboardRegionKey.Create('\','|','',''
                                                   ,[kbmrkoPresentAuto],vkOEM102));
     Map(OEM_Comma,TkbmFMXKeyboardRegionKey.Create(',','<','',''
                                                   ,[kbmrkoPresentAuto],vkOEMComma));
     Map(OEM_Period,TkbmFMXKeyboardRegionKey.Create('.','>','',''
                                                   ,[kbmrkoPresentAuto],vkOEMPeriod));
end;
As you can see, it follows a similar setup as the layout class. There is a GetName and a Define method that needs to be overridden.
The region maps the text to be returned, Normal, Shifted, with AltGr and with Control pressed, how to present the texts, and optionally which virtual key code really to return for that particular key.
We take use the method Map to define the mapping for each key for the region.
There are a couple of helper methods to provide mapping the ordinary 0..9 keys, QWERTY keys, AZERTY keys, numpad 0-9 keys and numpad math keys which you can use to do the bulk of mapping automatically. You can always redo mapping of a subset of keys afterwards which we will see later in the Danish region class.
The first virtual key (apart from all the mappings done in the helper methods) being mapped is the space key. Since the space key should simply make a space and nothing else, hence no reaction to Control, AltGr or Shift keys, it is a simple mapping:
However OEM_1 (the key to the right of the L button on the Alphanumeric layout) can return different things depending on if Shift is pressed, while it should ignore presses with AltGr or Control pressed. For that reason the mapping code looks like this:
It is also stated that the virtual keyboard code returned for that particular key should be vkOEM1. Further we have provided some options for the mapping. The options usually includes information about how the key should be presented.
There are different presentation modes which affects texts placement on the key surface. The surface can be divided up in to 1, 2, 3 or 4 zones, affecting both the potential size and placement of the text.
kbmrkoPresentAuto – Let the rendering features of kbmFMXKeyboard automatically determine how many zones to present on the key, depending on the number of possible values the key can provide. The normal non shifted key value will be shown in zone 1.
kbmrkoPresentAutoShift – Same as kbmrkoPresentAuto, except that the shifted key value will be shown in zone 1.
kbmrkoPresentNormal – Only present one zone with the contents from normal.
kbmrkoPresentShift – Only present one zone with the contents from the shifted value.
kbmrkoPresentAltGr – Only present one zone with the contents from the AltGr value.
kbmrkoPresentControl – Only present one zone with the contents from the Control value.
kbmrkoPresentNormalCustom — Only present one zone, but rather than presenting normal value, present a custom value. Useful for as example the Backspace key where you might want to present a left arrow (graphical) or the text “Backspace” rather than the character #8 which is backspace and which is the key’s normal (un-shifted, un-altgr’ed, un-controlled) value.
kbmrkoCapsLockSupport – Only keys with this option set, reacts to CapsLock.
If we take a look at some parts of the Danish region class, we can see a couple more interesting bits:.
     // Danish keys a-z are almost the same, with the exception of the
     // addition of AltGr E for euro character.
     Define_QWERTY;
     Map(vkE,TkbmFMXKeyboardRegionKey.Create('e','E','€',''
                                            ,[kbmrkoPresentAutoShift,kbmrkoCapsLockSupport]));

     Define_Numpad0_Numpad9;
     Define_NumpadMath;

     // TkbmFMXCustomKeyboard layout virtual key codes can refer to virtual key codes or OEM_
     // custom virtual key codes that follows US placement of keys on a physical keyboard.
     // On a Danish keyboard, the physical keys return a different virtual key code, why
     // the US OEM_ code is mapped to the appropriate virtual key code matching a Danish region.
     Map(vkSpace,TkbmFMXKeyboardRegionKey.Create(' '));
     Map(vkTab,TkbmFMXKeyboardRegionKey.Create(#9));
     Map(vkDecimal,TkbmFMXKeyboardRegionKey.Create('.'));

     Map(OEM_1,TkbmFMXKeyboardRegionKey.Create('æ','Æ','',''
                                             ,[kbmrkoPresentShift,kbmrkoCapsLockSupport],vkOEM3));
     Map(OEM_2,TkbmFMXKeyboardRegionKey.Create('-','_','','',[kbmrkoPresentAuto],vkOEMMinus));
     Map(OEM_3,TkbmFMXKeyboardRegionKey.Create('½','§','','',[kbmrkoPresentAuto],vkOEM5));
     Map(OEM_4,TkbmFMXKeyboardRegionKey.Create('å','Å','',''
                                             ,[kbmrkoPresentShift,kbmrkoCapsLockSupport],vkOEM6));
     Map(OEM_5,TkbmFMXKeyboardRegionKey.Create('''','*','','',[kbmrkoPresentAuto],vkOEM2));
     Map(OEM_6,TkbmFMXKeyboardRegionKey.Create('¨','^','~','',[kbmrkoPresentAuto],vkOEM1));
     Map(OEM_7,TkbmFMXKeyboardRegionKey.Create('ø','Ø','',''
                                             ,[kbmrkoPresentShift,kbmrkoCapsLockSupport],vkOEM7));

     Map(vk0,TkbmFMXKeyboardRegionKey.Create('0','=','}'));
     Map(vk1,TkbmFMXKeyboardRegionKey.Create('1','!'));
     Map(vk2,TkbmFMXKeyboardRegionKey.Create('2','"','@'));
     Map(vk3,TkbmFMXKeyboardRegionKey.Create('3','#','£'));
     Map(vk4,TkbmFMXKeyboardRegionKey.Create('4','¤','$'));
     Map(vk5,TkbmFMXKeyboardRegionKey.Create('5','%'));
     Map(vk6,TkbmFMXKeyboardRegionKey.Create('6','&'));
     Map(vk7,TkbmFMXKeyboardRegionKey.Create('7','/','{'));
     Map(vk8,TkbmFMXKeyboardRegionKey.Create('8','(','['));
     Map(vk9,TkbmFMXKeyboardRegionKey.Create('9',')',']'));

     Map(OEM_Minus,TkbmFMXKeyboardRegionKey.Create('+','?','\','',[kbmrkoPresentAuto],vkOEMPlus));
     Map(OEM_Plus,TkbmFMXKeyboardRegionKey.Create('´','`','|','',[kbmrkoPresentAuto],vkOEM4));
     Map(OEM_102,TkbmFMXKeyboardRegionKey.Create('<','>','\','',[kbmrkoPresentAuto],vkOEM102));
     Map(OEM_Comma,TkbmFMXKeyboardRegionKey.Create(',',';','','',[kbmrkoPresentAuto],vkOEMComma));
     Map(OEM_Period,TkbmFMXKeyboardRegionKey.Create('.',':','','',[kbmrkoPresentAuto],vkOEMPeriod));
First you may notice that the virtual key vkE is remapped. It was originally mapped in the Define_QWERTY method, but now it is remapped. The reason is to provide support for AltGr + E which should result in the Euro currency character.
In addition the OEM virtual keys are remapped to match the Danish layout. Notice that several of them also remaps what is actually going to be returned as the virtual key code when the button is pressed. The key defined in the layout as OEM_Minus will for example return vkOEMPlus instead of the default vkOEMMinus.
All this is to ensure that the keyboard really acts as a regular region mapped keyboard.
You make the region available for use by registering it:
Occasionally you want to show a complete keyboard based on one of the defined layouts (bundled or custom), but want some of the keys either to now show or be disabled, or perhaps only to show the normal caption on an otherwise multi zone key. This is what masks are for.
Let us look at a sample mask class:
  TCustom1Mask = class(TkbmFMXCustomKeyboardMask)
  protected
     procedure Define; override;
  public
     class function GetName:string; override;
  end;
As we have seen with layout and region, we define a name for the mask, and we override the Define method.
This particular mask will, when selected, disable all keys for the active layout, then enable the left, right, backspace, enter and clear keys, and then enable each of the A-Z and 0-9 keys, but not show anything but the normal caption for the key.
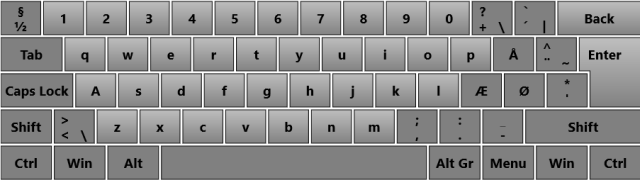
If the mask is activated on an alphanumeric keyboard in Danish region, it would look like this:
The darkened keys are no longer clickable.
A mask is registered before use like this:
kbmFMXRegisteredKeyboardMasks.Add(TCustom1Mask);
And can be selected like this:
mykeyboard.Mask:=TCustom1Mask.GetName;
Or:
mykeyboard.Mask:='Custom1';
Animation – TkbmFMXCustomKeyboardAnimation
To mimic a modern RGB keyboard, kbmFMXKeyboard contains the ability to make key animations.
The animator typically manipulates each defined keys LED settings and the easiest way for those scenarios is to descend from TkbmFMXCustomFloatKeyboardAnimation which contains the basic features for making smooth LED animations.
Let us look at the simpler Breathe animation bundled with kbmFMXKeyboard. The Breathe animator animates a single color for all keys, in a breath in/out kind of style.
Let us look at code:
  TkbmFMXBreatheKeyboardAnimation = class(TkbmFMXCustomFloatKeyboardAnimation)
  private
    FColor:TAlphaColor;
  protected
    procedure Start; override;
    procedure Update; override;
  public
    class function GetName:string; override;
    constructor Create(const AKeyboard:TkbmFMXKeyboard); override;
    property Color:TAlphaColor read FColor write FColor;
  end;
This class is slightly more complex to create. As usual GetName is overriden, but also two procedures Start and Update. There also exists a Stop method that can be overridden if needed.
The purpose of the Start method, is to start whatever needs to be started when the animation is started. The Update method is called very frequently while the animation runs, and its purpose is to update the layout’s keys by, in this case, manipulating the color and intensity of the LED for each key.
class function TkbmFMXBreatheKeyboardAnimation.GetName:string;
begin
     Result:='Breathe';
end;

constructor TkbmFMXBreatheKeyboardAnimation.Create(const AKeyboard:TkbmFMXKeyboard);
begin
     inherited Create(AKeyboard);
     FColor:=TAlphaColorRec.Green;
end;

procedure TkbmFMXBreatheKeyboardAnimation.Start;
var
   i,j:integer;
   r:TkbmFMXKeyRow;
   k:TkbmFMXKey;
begin
     for i:=0 to Keyboard.Rows.Count-1 do
     begin
          r:=Keyboard.Rows.Items[i];
          for j:=0 to r.Count-1 do
          begin
               k:=r.Keys.Items[j];
               if k.VirtualKey<>vkNone then
                  if FColor<>TAlphaColorRec.Null then
                     k.AmbientLEDColor:=FColor;
          end;
     end;

     Ani.Interpolation:=TInterpolationType.Circular;
     Ani.Duration:=2.5;
     inherited;
end;

procedure TkbmFMXBreatheKeyboardAnimation.Update;
var
   i,j:integer;
   r:TkbmFMXKeyRow;
   k:TkbmFMXKey;
begin
     for i:=0 to Keyboard.Rows.Count-1 do
     begin
          r:=Keyboard.Rows.Items[i];
          for j:=0 to r.Count-1 do
          begin
               k:=r.Keys.Items[j];
               if k.VirtualKey<>vkNone then
               begin
                    k.AmbientLEDIntensity:=Value;
                    k.AmbientLED:=true;
               end;
          end;
     end;
end;
In case of the Breathe animator, the Start method initializes all keys with the color that has been defined on the animation instance, except if a key is a spacer only (its virtual key code is vkNone) or the given color is undefined.
In addition it set’s up to use a circular animation with an interval of 2.5 seconds. The Ani instance is made available in the TkbmFMXCustomFloatKeyboardAnimation class.
The update method will be automatically called whenever there is a need to change the animated look of the keyboard. In our case we iterate thru all keys on all rows, and setup the intensity of they key. The property Value also comes from the float keyboard animation class, and is a floating point value between 0 and 1.
You can change the color of the currently running breathe animation like this:
(mykeyboard.ActiveAnimation as TkbmFMXBreatheKeyboardAnimation).Color:=TAlphaColorRec.Red;
Renderer – TkbmFMXCustomStandardKeyboardRenderer
The renderer is one of the most complex classes, since it needs to figure out how to render the complete keyboard. kbmFMXKeyboard comes with TkbmFMXFlatKeyboardRenderer which renders keys in a flat 2D look, but by adding a custom renderer one could have the keyboard rendered in other ways.
However the flat keyboard renderer does have many configuration options that makes it a good pick for most scenarios.
The flat keyboard renderer currently inherits all its functionality from the TkbmFMXCustomStandardKeyboardRenderer which thus is also available for custom renderes.
I will not go into details about the renderer in this post, but only mention some of the optional settings you can do by accessing the active renderers properties like this:
(mykeyboard.ActiveRenderer as TkbmFMXCustomStandardKeyboardRenderer).someproperty
The following properties are available:
TextSettings – for setting text font size/style
KeyStroke – for setting how the key outline is drawn when not pressed
KeyFill – for setting how the key’s inside is filled when not pressed
KeyDownStroke – for setting how the key outline is drawn when pressed.
KeyDownFill – for setting how the key’s inside is filled when pressed.
KeyDisabledFill – for setting how the key’s inside is filled when the key is visible but disabled.
TextDisabledSettings – for setting text font size/style when the key is visible but disabled.
Background – to specify any custom background the keyboard should have.
Margin – to specify any custom margins for the keyboard.
AmbientLEDRangeFactor – to specify how far the LED background light from each key reach. Default 1.2
AmbientLEDIntensity – to specify the overall intensity of the LED background light. Default 0.2
Conclusion
The kbmFMX Firemonkey based embeddable keyboard contains a myriad of configurations which should make it possible to emulate most true keyboards.
However the keyboard also comes in a variant that contains a one or more line fixed display where editing can take place. This is however a topic for another blog.